Table of Contents
Introduction#
This guide will help you getting started with Makumba using the Eclipse IDE. It explains the notion of Makumba Data Definitions, and shows you how to make a simple site where you can display and create data.
We'll take the example of a company management site, where you can manage the employees, departments and projects of a company.
Download and installation#
You can use Maven in order to create a new template project for makumba.
Installation with Maven on the command line#
On the command line, type:
mvn archetype:generate \
  -DarchetypeCatalog=http://www.makumba.org \
  -DgroupId=myorganisation \
  -DartifactId=myWebapp \
  -Dversion=1.0-SNAPSHOT \
  -Dpackage=org.myorganisation
This will create a new makumba project with a pre-configured HSQLDB database and a sample page. Next, you can run
mvn tomcat:run
in order to run the web-app using Tomcat (we'll add support for Jetty soon).
Type
mvn eclipse:eclipse
in order to set up the project so that it can be imported into eclipse.
Installation with Eclipse and the m2eclipse plugin#
Alternatively, you can directly create the project in Eclipse using e.g. the m2eclipse plugin . In this case you can directly look for the archetype group "org.makumba" in the archetype catalog assembled by the Nexus Indexer.
Create a new maven project
Enter the workspace settings
The next page will be shown
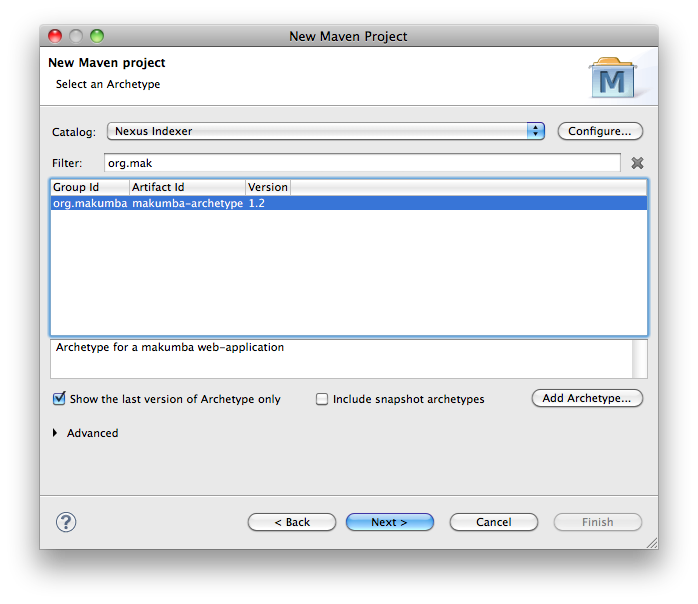
From catalogs, choose Nexus Indexer and type 'org.makumba' in the filter field
Enter the project specific information
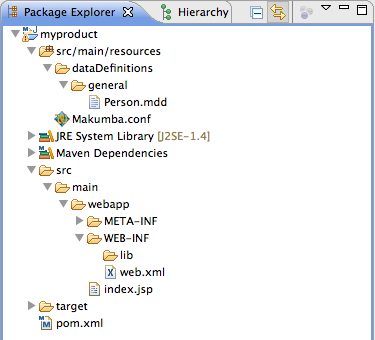
The project has then following structure
This is the standard Maven project structure. The resulting web-application structure (according to the Servlet Standard 2.4) is as follows:
index.jsp
META-INF/
WEB-INF/
  web.xml
  lib/
  classes/
    dataDefinitions/
      general/
        Person.mdd
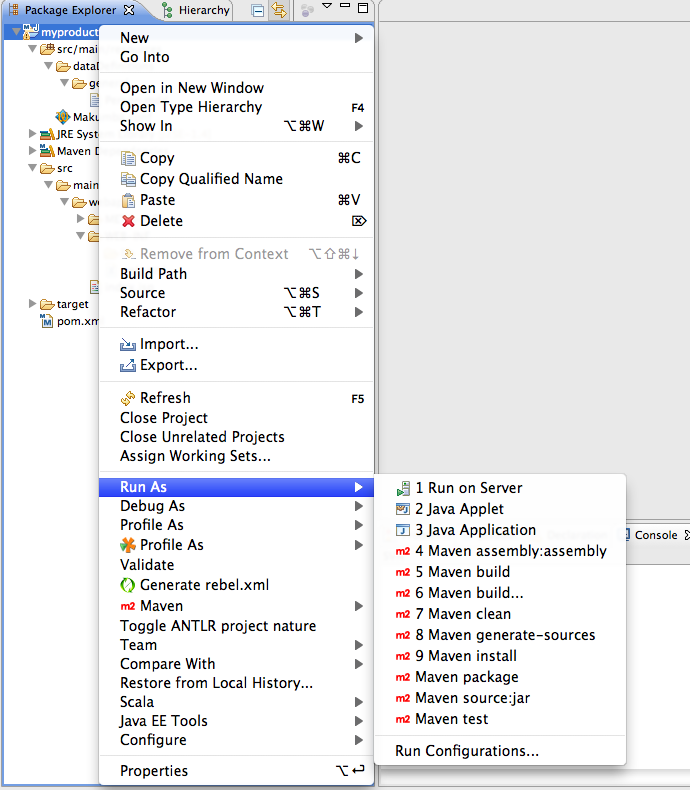
Now click the green play button and choose Run > Maven Build.

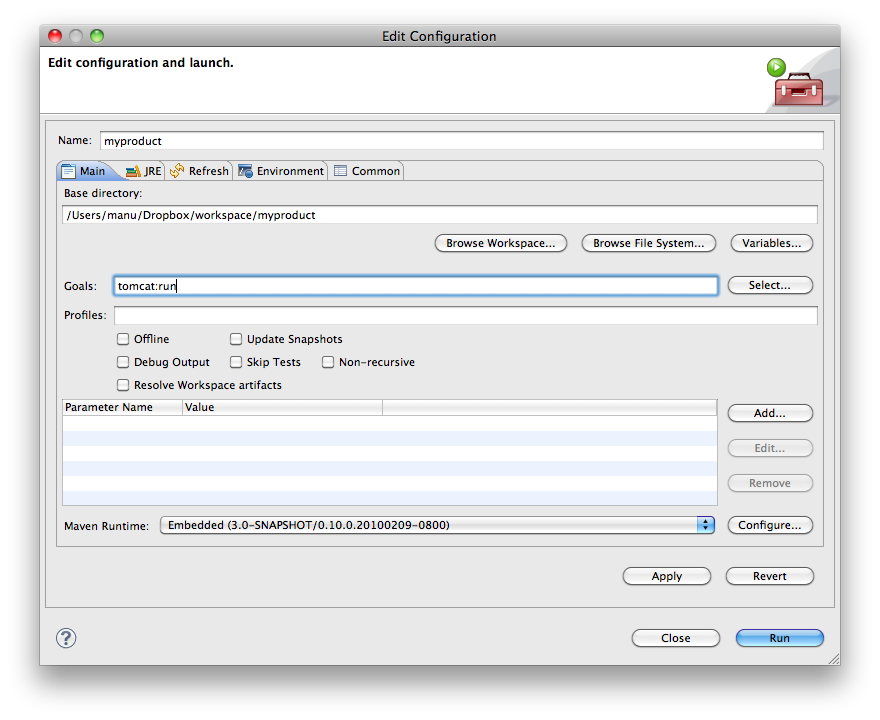
Give the run configuration a name (here 'myproduct') and type tomcat:run in the Goals field. Then click run.

You should now be able to access the default site in your browser at http://localhost:8080/myproduct
Describing the data#
Makumba uses so-called Makumba Data Definitions.MDDs are simple text files that contain the description of an entity, i.e. its fields but also validation rules and query functions. These files are kept in the dataDefinitions directory in the classpath of the web-application.
Start by creating a new company directory in the src/main/resources/dataDefinitions directory and create the file Employee.mdd with the following content:
name = char[200]
surname = char[200]
gender = int{"Male" = 10, "Female" = 20}
birthdate = date
salary = real

fullName() { name || (' ' || surname) }
Makumba automatically generates the database schema based on MDDs.
MDD changes are taken into account when the webapp is reloaded, provided that altering the corresponding type is allowed in the configuration.
Manipulating the data#
Entering new data#
Let's make it possible to feed some data to our webapp.For this, let's create a page that contains a mak:newForm, which enables us to enter new data. Create the file employeeNew.jsp with following content:
<%@ taglib uri="http://www.makumba.org/presentation" prefix="mak" %>
<html>
<head>
<title>Create new employee record</title>
</head>
<body>

<mak:newForm type="company.Employee" method="post" action="index.jsp">
  <table>
    <tr>
      <th>Name</th>
      <td><mak:input field="name" /></td>
    </tr>
    <tr>
      <th>Surname</th>
      <td><mak:input field="surname" /></td>
    </tr>
    <tr>
      <th>Birthdate</th>
      <td><mak:input field="birthdate" /></td>
    </tr>
    <tr>
      <th>Salary</th>
      <td><mak:input field="salary" /></td>
    </tr>
    <tr>
      <td><input type="submit" value="Add"> <input type="reset" value="Cancel" onClick="javascript:back();"></td>
    </tr>
  </table>
</mak:newForm>

</body>
</html>
When submitting the form, the data is directly saved into the database, without any additional effort. Let's explain a bit each of the elements:
- the mak:newForm tag generates the form for a given type (in our case, the type is company.Employee). Upon form submission an INSERT query is generated. The action attribute specifies the page to show after the form is submitted.
- the mak:input tags generate the inputs, depending on their type (for instance, the birthdate field is automatically shown as a date input). The field attribute corresponds to the field name in the MDD.
Displaying data#
Let's now see how to display data using the mak:list tag. For this we will edit the index.jsp to display the list of all Employees:
<%@ taglib uri="http://www.makumba.org/presentation" prefix="mak" %>
<html>
  <head>
    <title>Makumba template welcome page</title>
  </head>
  <body>

    <h1>List of employees</h1>
    <mak:list from="company.Employee e">
      <em><mak:value expr="e.fullName()" /></em> born on <mak:value expr="e.birthdate" /><br />
    </mak:list>

  </body>
</html>
- the mak:list tag generates a SELECT query. In our case, the query's FROM section is company.Employee.
- the mak:input tags represent the projections of the query. The expr attribute can contain a field, an MQL expression or a query function name.
mak:list tags can be nested, so as to display the content of sets.
Modifying existing data#
The mak:editForm tag lets you edit existing data.Let's illustrate this with a new file employeeEdit.jsp containing the following:
<%@ taglib uri="http://www.makumba.org/presentation" prefix="mak" %>
<html>
  <head>
    <title>Edit employee record</title>
  </head>
  <body>

  <mak:object from="company.Employee e" where="e=$employee">
  <mak:editForm object="e" method="post" action="index.jsp">
    <table>
      <tr>
        <th>Name</th>
        <td><mak:input field="name" /></td>
      </tr>
      <tr>
        <th>Surname</th>
        <td><mak:input field="surname" /></td>
      </tr>
      <tr>
        <th>Birthdate</th>
        <td><mak:input field="birthdate" /></td>
      </tr>
      <tr>
        <th>Salary</th>
        <td><mak:input field="salary" /></td>
      </tr>
      <tr>
        <td><input type="submit" value="Edit"></td>
      </tr>
    </table>
  </mak:editForm>
  </mak:object>

  </body>
</html>
When submitting the form, the data is directly updated in the database, without any additional effort.
- the mak:editForm is similar to the mak:newForm but will generate an UPDATE query instead of an INSERT one upon form submission
- the mak:input tags, just as when used in combination with the mak:newForm, generate the inputs, depending on their type (for instance, the birthdate field is automatically shown as a date input). The field attribute corresponds to the field name in the MDD.
Note however that one needs to specify the object that is to be edited. This is achieved by e.g. passing the employee parameter to the edit page. For this purpose, let us edit index.jsp and add from there a link to employeeEdit.jsp
<%@ taglib uri="http://www.makumba.org/presentation" prefix="mak" %>
<html>
  <head>
    <title>Makumba template welcome page</title>
  </head>
  <body>

    <h1>List of employees</h1>
    <mak:list from="company.Employee e">
      <em><mak:value expr="e.fullName()" /></em> born on <mak:value expr="e.birthdate" />
      [<a href="employeeEdit.jsp?employee=<mak:value expr='e'/>">Edit</a>]<br />
    </mak:list>

  </body>
</html>
Deleting data#
Finally deleting data is done via the mak:delete tag. This can be illustrated by creating a file employeeDelete.jsp with the following content:
<%@ taglib uri="http://www.makumba.org/presentation" prefix="mak" %>
<html>
  <head>
    <title>Confirm employee record deletion</title>
  </head>
  <body>

  <mak:object from="company.Employee e" where="e=$employee">
    <mak:delete object="e" action="index.jsp">
      Delete <mak:value expr="e.fullName()"/>
    </mak:delete>
  </mak:object>

  </body>
</html>
mak:delete is rendered as a link or a button, that once clicked will generate a DELETE query.
Again one needs to specify the object that is to be deleted. This is achieved by e.g. passing the employee parameter to the delete confirmation page. For this purpose, let us edit index.jsp and add from there a link to employeeDelete.jsp
<%@ taglib uri="http://www.makumba.org/presentation" prefix="mak" %>
<html>
  <head>
    <title>Makumba template welcome page</title>
  </head>
  <body>

    <h1>List of employees</h1>
    <mak:list from="company.Employee e">
      <em><mak:value expr="e.fullName()" /></em> born on <mak:value expr="e.birthdate" />
      [<a href="employeeEdit.jsp?employee=<mak:value expr='e'/>">Edit</a>]
      [<a href="employeeDelete.jsp?employee=<mak:value expr='e'/>">Delete</a>]<br />
    </mak:list>

  </body>
</html>
Validating data on input#
makumba makes it possible to validate data consistently for each entity using validation rules that are defined in the Makumba Data Definition.
Add the following line in Employee.mdd file:
range(salary) { 500..? } : "The minimum legal salary is 500 euro"
This will ensure that when a value is entered for the salary (on creation or edition), the minimal amount is respected (the error message will be displayed otherwise).
makumba has more kind of validation rules, check the validation rule documentation to learn more.
Business Logic#
In order to perform more advanced processing of the form data, makumba defines a Java-based Business Logic mechanism. Note that if you only need to handle simple cases, you won't need to code one single line of Java in order to get the application running.Edit src/main/resources/Makumba.conf and add the following line in the [businessLogicPackages] section:
[businessLogicPackages]
default=com.myCompany.companyManager
This will map the default resolution for business logic classes to the com.myCompany.companyManager package. You can thus structure different parts (folders) of the web-application and associate them with specific business logic packages. This comes in handy when your application starts to grow.
Now it's time to create a bit of business logic. Create the file src/main/java/com/myCompany/companyManager/Logic.java and insert the following content:
package com.myCompany.companyManager;

import java.util.Logger;
import org.makumba.Attributes;
import org.makumba.LogicException;
import org.makumba.Pointer;
import org.makumba.Transaction;

public class Logic {

  private Logger logger = Logger.getLogger("com.myCompany.employee");

  public void after_newCompanyEmployee(Pointer p, Dictionary<String, Object> d, Attributes a, Transaction t) throws LogicException {

  logger.info("New employee " + d.get("name") + " " + d.get("surname") + " created.");

  }

}
This method (a so-called form handler) will be executed after the Employee record has been inserted into the database. There are more kind of handlers, to get a better insight into the mechanism, check the business logics documentation.
In general, makumba web-applications define one root Logic class which is then extended by all other Logic classes. This makes it possible to use the same methods in all Logic classes using inheritance.


